

I got started in photography in 2005 on my first trip out of the country and used iPhoto to organize photos until about 2011 when I upgraded to Aperture. About a year ago, Apple decided to stop updating Aperture. On one hand, this is pretty frustrating because I loved Aperture and now it will quickly grow old. But on the other hand, it had been getting a little long in the tooth and this is a good excuse to move over to Lightroom. Starting in 2014 I started using Lightroom for all new projects but I’ve only recently begun migrating past projects over to Lightroom. Here’s how I did it.
Keep in ming as you read this that I’m not saying to get rid of Aperture. Apple isn’t going to make Aperture explode. It will continue to work in its current form until it is no longer supported by the OS. I plan on keeping Aperture installed so that I can use it if necessary. However, it is much more convenient to have all my photos organized in the same place so I’ll also move all the old stuff over to Lightroom.
I should also note that I don’t like the Lightroom utility to move over the photos. I just don’t trust it to manage things as I’d like so doing it manually gives me the ultimate control.
First, move over all the easy stuff. For me, this is all the old photos I have that have never been retouched. This includes old family photos, photos from my first trip to Europe, etc. To export these, just highlight them, click File>Export, and select originals. I suggest exporting a single folder at a time and then importing that single folder into Lightroom before continuing. This made it much easier for me to keep things straight but you do you.

Next, move over the slightly harder stuff. For me, this was photos shot in jpg that had been edited. These were photos from my second trip to Europe before I knew the power of RAW photos. These are exported just like the untouched photos but instead of selecting “originals” in the export menu, select “versions”. I don’t see a lot of reason to export the original and the edited version of these photos separately since it’s just a jpg file and I don’t really think you’re losing much.
Now, the harder photos: the edited raw photos. Lightroom and Aperture are both non-destructive editors. Meaning they store the original photo as well as a list of edits made to it. Whenever you view the photo, the computer applys all the edits you’ve made and shows it to you. If you decide you want to change the crop or bring the color back from an early change to black and white, you can do that because it didn’t permanently alter the image when you made those earlier changes. The values of all the sliders and such are kept in a database file in the catalog. Even though Aperture and Lightroom have many similar sliders and brushes, their database files are proprietary and cannot be read by the other.
So this gives us three options. Option 1: export the edited photo as a jpg or tiff. This is will the nice edited photo you love but because it is exported as a jpg, all of the previous edits are baked in and can’t be changed as before. Option 2: export the original raw file. This doesn’t have any lovely edits but it is also pure and because it is a raw file, you can get more data out of the highlights and shadows. Option 3: both. Export the original raw file and the edited jpg. You’ll probably be fine with the photo as you edited it so the jpg will be fine. But you keep the raw file with it just in case you decide to make some major changes. This is the ultra cautious version.
To start, export the original raw files and then export the edited versions as we discussed above. Before you import them into Lightroom, we first need to change how Lightroom treats raw and jpg files with the same name. Normally, Lightroom with import both of them but only allow you to see and work with the raw. It keeps the jpg but just not in a way that is useful to you. So go to the preferences, click the general tab, and click “Treat JPEG files next to raw files as separate photos.”

Now, import the files you exported from Aperture. You should see that there are many doubles, though often with color and cropping differences.

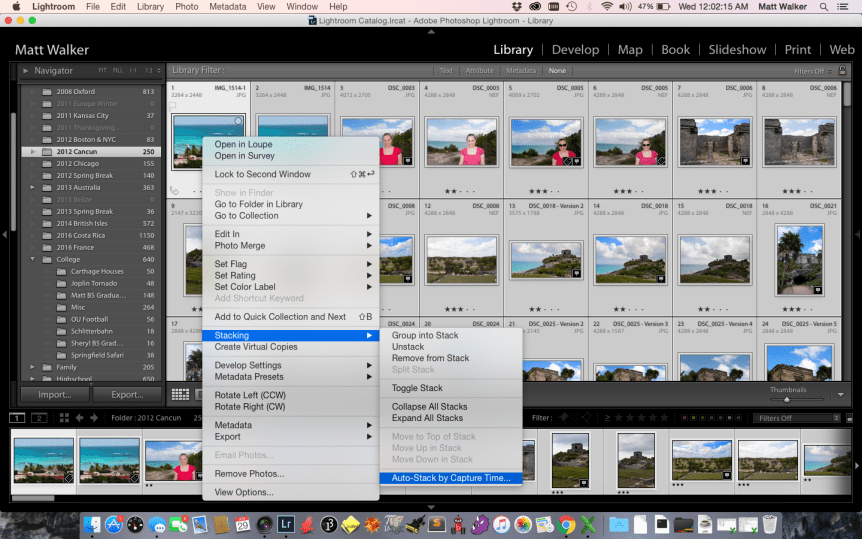
Next, select all of the photos in the folder. Right click a photo, select “Stacking”, and then select “Auto-Stack by Capture Time.”
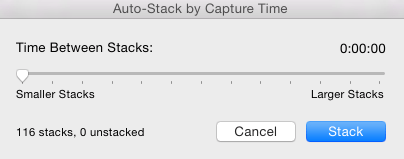
Now we need to tell Lightroom how long of a time should be between each stack. In this case, the raw and jpg files should have the exact same time so I set the time to 0 seconds.
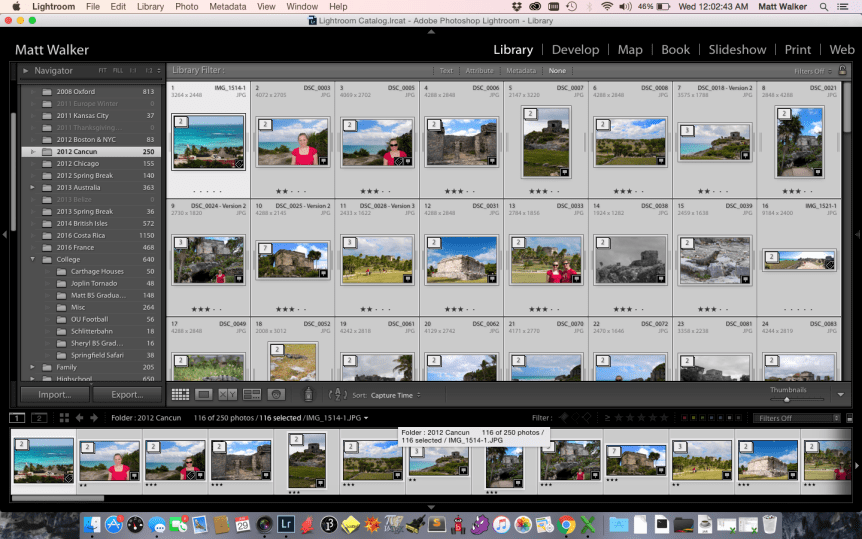
After this, you can right click a photo, select stacking, and collapse all stacks. And your workspace is now much cleaner as seen below.
And that’s how I migrated from Aperture to Lightroom. Questions? Comments? I’d love to hear them below.
